I don’t know about you, but it seems to be baby season within our gaggle of family + friends at the moment! The “absolutely essential” first reaction to a pregnancy or new baby announcement is a champagne toast (as if we need an excuse!), but I also love to send a congratulations card to the new parents (or soon-to-be-parents as the case may be).
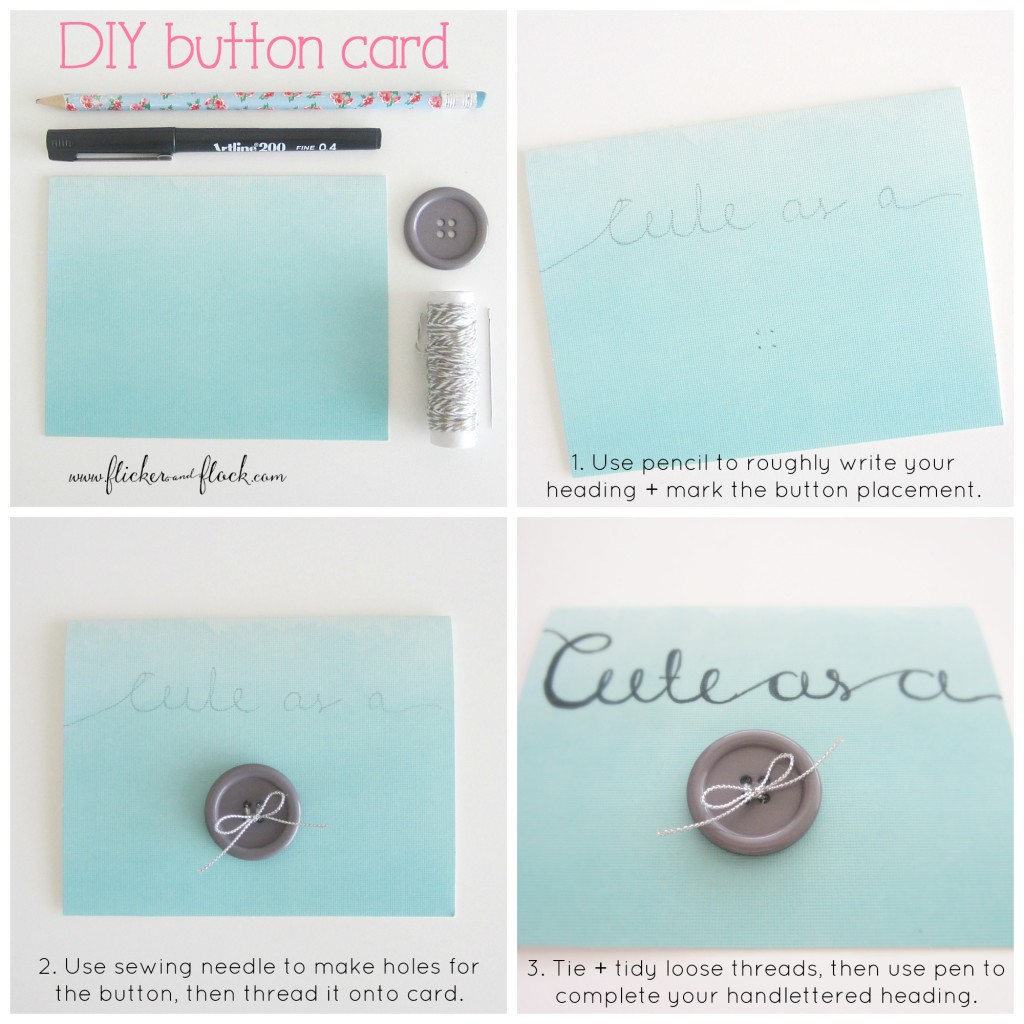
I decided at some point in the last year that I’d try to make all of my greeting cards from now on, and cards relating babies have got to be my absolute favourite to do! So I wanted to share this just-made super-sweet “Cute as a Button” DIY card for new parents that you can easily recreate yourself.
You’ll need:
- Pencil, pen + eraser
- 1 x blank card (I get mine in packs from Spotlight, but you can easily fold a plain piece of cardboard to make your own)
- 1 x button (I ‘shopped-at-home’ as explained in this post and found tons of suitable spare buttons lying forgotten in a drawer for coats + shirts most likely binned long ago, but you can also choose your own pretty ones from Spotlight)
- 1 x sewing needle or a sharp tool that can make holes in the card for your button
- Thread (I used basic cotton twine, but anything like cotton thread or string or ribbon will do – as long as it can fit through the button holes, it will work!)
To make the “Cute as a Button” DIY card for new parents, simply:
- Use your pencil to plan the layout of the card: Lightly pencil the words ‘cute as a’ wherever you like onto the card. Then position the button on the card + hold in place with your hand. Dot your pencil into the holes of the button so you know where to punch holes in the next step. Set the button to one side.
- Use sewing needle to punch holes for the button: Gently push your sewing needle (or alternative sharp tool) into the card where the pencil marks for the sew-through button holes are. You should now have holes that line up perfectly with your button when it’s placed back on top. This will make it really easy for you to sew the button on in the next step.
- Sew or tie the button onto the card: Hold the button in place on the card so you can secure it with thread. Either thread your needle + sew the button onto the card that way, or simply guide your thread or ribbon through the button holes + holes in the card until tight + secure. Knot or tie the thread so that the button stays in place. This can be done on the inside of the card if you don’t want the tie visible, or you could do a bow on the outside like I did.
- Use your pen to complete the lettering: Draw in your final flourishes + touches on the wording, then rub out any visible pencil lines with your eraser. Remember, when it comes to handlettering or handwritten-anything, the charm is in the imperfections + the fact it’s written by hand not machine. So don’t agonise over making each letter perfect, it’s better just the way it is!
Please feel free to use this design as inspiration for your own creation, and tweak it as you see fit! Perhaps you want to experiment with colours, or multiple buttons for twins, or varying sized buttons to represent other members in the “new button’s” family. I’d love you to share what you come up with on the Flicker & Flock Facebook page or Instagram so that others can be inspired!
And if you’re still not sure if you can be bothered going down the homemade card route, here are just a couple of reasons that might sway you:
- It’s completely unique and can be personalised to the person you’re giving it to; there’s no chance that someone else has sent them the exact same card!
- Anything you personally spend time + effort on – be it cake, lasagne, a beaded bracelet, or a birthday card – is going to make the recipient feel pretty special and loved, which is the ultimate aim.
- Homemade goodness should be rustic, quirky + imperfect, so don’t agonise over every line + detail; it really is the thought that counts.
- I find that making things is therapeutic + fun + challenging + rewarding, especially when it’s for the people I care about the most. Win win.
Happy card creating! x


![DIY paper flower card [+ FREEBIE template]](https://flickerandflock.com/wp-content/uploads/2016/05/MDay-card_thumbnail-150x150.jpg)


Leave a Reply